Breaking

Friday, May 17, 2019

May 17, 2019

How to Spy on Competitors shopify store 12 Tools & Hacks

Want to Know How to Spy on Competitors? 12 Tools & Hacks


Want to know who your biggest rivals are and how to spy on competitors? We’ve got a box of handy tricks and apps for you to use.
To become a successful online store, you need to keep your finger firmly on the pulse of your competitors. Why? Because researching will point to areas where you’re lacking, help you minimize your risk when launching new products or niche categories, and ensure you are able to put your brand front and center to potential customers already searching elsewhere for what you’re selling.
In this post, we give you the top 12 tools and hacks you can use to find out who your biggest competitors are and how you spy on them as a way to spot hidden, untapped markets and marketing tricks.
Let’s get right to it.

Hacks and Tools to Find Your Biggest Competitors

1. Use Google to Find Out Who Your Competitors Are [Shopify]

If you’re one of the 600,000+ merchants on Shopify then here’s an easy way you can find out who your biggest competitors are. Simply type site:myshopify.com and your store’s main keyword or phrase into Google and see what comes up. Like this: 
This will bring up all the Shopify stores, even if they have their own domains like our favorite merchants Gearbunch, associated with that keyword.

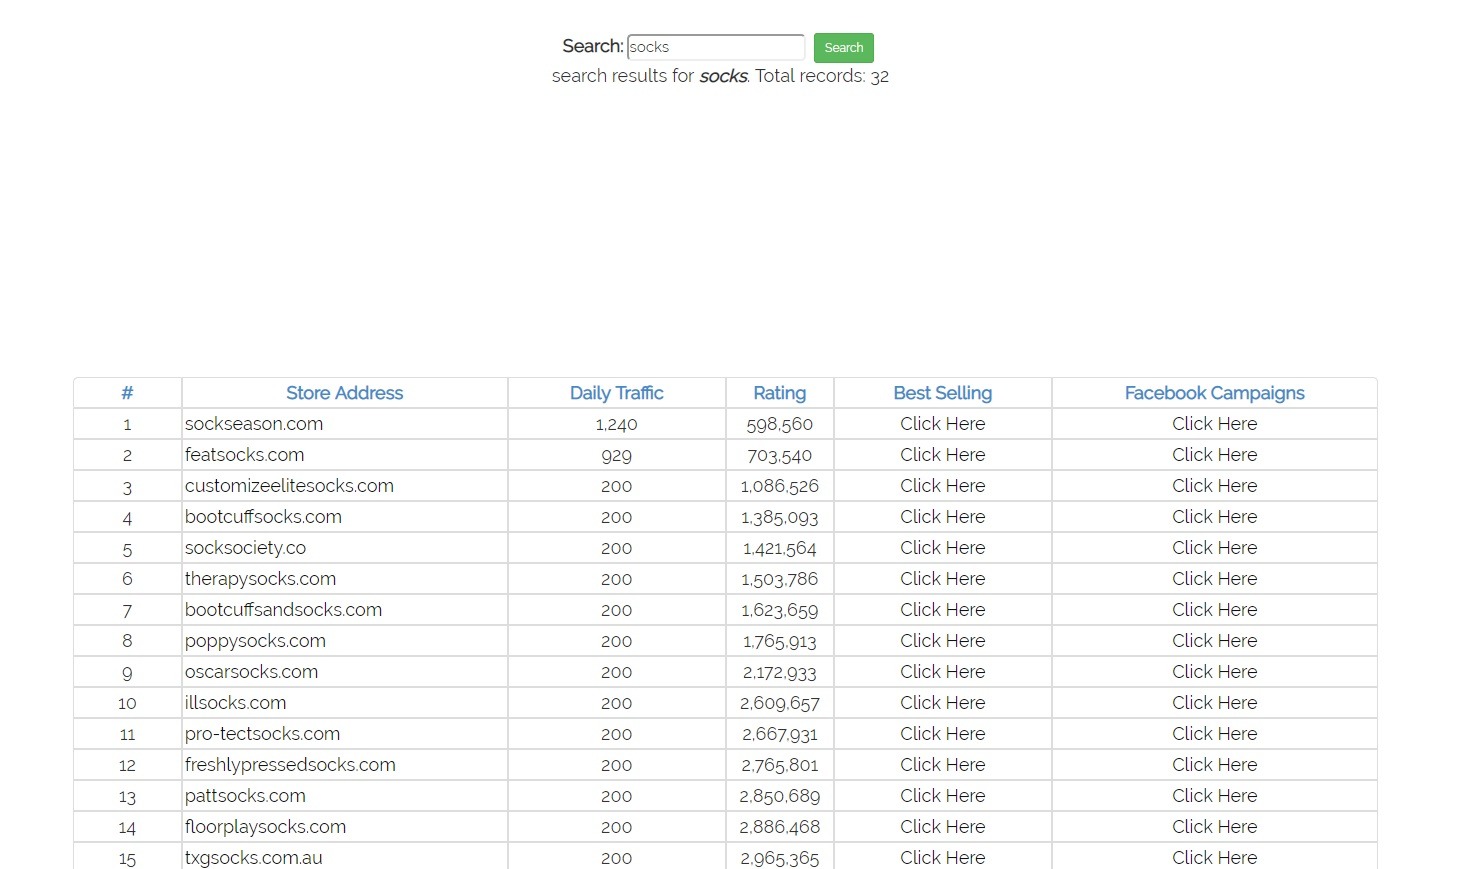
2. Research Top Shopify Stores in Your Niche with Xpareto 

Xpareto is a website that allows you to search for top Shopify stores based on their related keywords. It will show you rank, daily traffic, and links to best-selling products and Facebook campaigns.
xpareto website to spy on shopify stores

Hacks and Tools to Spy on Your Competitors

3. Add the Wappalyzer Extension to Spy on Your Competitors’ Platforms

If you already know who your competitors are but want to know what eCommerce platform they’re using, you can check with WappalyzerWappalyzer is a Chrome and Firefox extension for analyzing websites to see which platforms and apps they are using.
Wappalyzer app for chrome

4. Find Out How Your Competitors’ Sites Rank with Moz Link Explorer

If you want to know how your online store measures against your competitors’ domain authority (DA) then Moz’s Link Exploreris the perfect spy tool. The DA metric developed by Moz ranks domains on a scale from 1 (bad) to 100 (excellent.)
moz link explorer search
moz link explorer search data
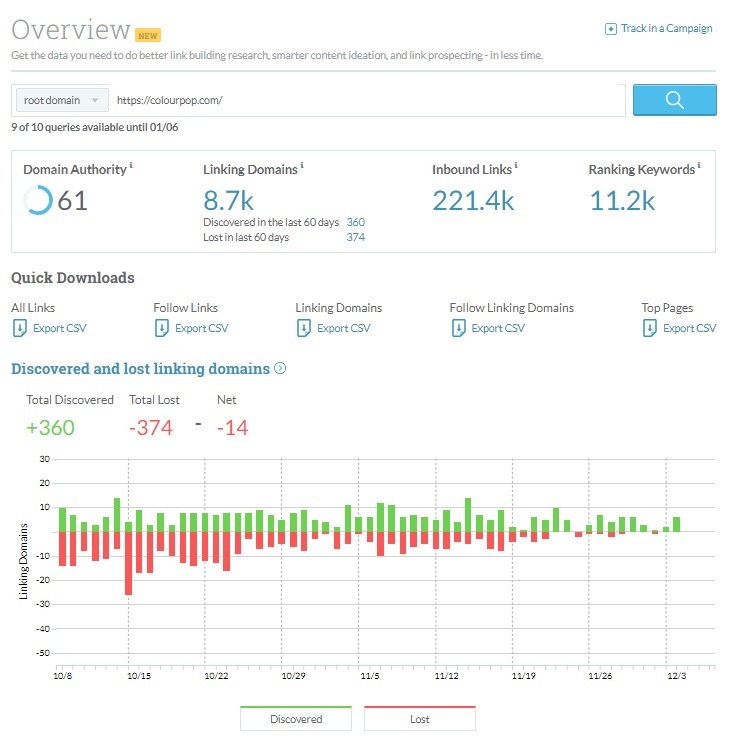
This handy report will show you how your competitors rank, the number of external linking domains and inbound links, their best-ranked keywords (in the top 50) and all their link data. Sure, by comparing this to your own you can see where you stand next to competitors, but that’s not the most valuable data. It’s their ranking keywords that can help point you in the direction of missed opportunities for possible sub-categories.

5. Spying on Your Competitors’ Facebook Info and Ads

Spying on your competitors on Facebook used to be a sneaky affair; but not anymore. Recently, Facebook decided to make this information accessible to all. All you need to do is access your competitors’ Facebook pages and scroll down to info and ads.
With this information, you can see a brand’s active campaigns including Facebook, Instagram and Messenger placement. You can also see the date a Facebook page was created, edited, name changes and the primary locations of page managers.
Beginner Tip: For more tips on spying on various aspects of your competitors’ Facebook content and ads, visit our How to Spy on Your Competitors on Facebook post.  

6. Find Out Your Competitors’ Diamond SKUs [Shopify]  

What is a Diamond SKU? you may ask. Diamond SKUs are top-selling products sold on Shopify stores. Why is this important? It may be easy to monitor your competitors’ best-selling products. This is where diamond SKUs are handy.
They are super simple to find; just add /collections/all?sort_by=best-selling to the end of any Shopify store URL. A page of their best-selling products or categories will populate, and offer valuable insights.
best selling products on shopify
Firstly, it points to best-selling products they are not selling on Amazon, opening up an opportunity for you to sell your similar product line on Amazon. Secondly, as your closest competitor, they would have a similar market to you and therefore you can use their best-sellers as inspiration for your own marketing strategies. And thirdly, it gives you access to a host of product ideas

Bonus Content: 60 Best-Selling Products to Sell Online in 2019

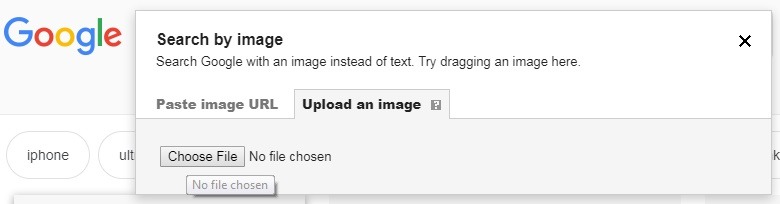
7. Use Reverse Image Search to See Where Your Competitors are Selling

If you want to know what your biggest competitors are up to, this Google hack will come in handy. All you need to do is go to your competitor’s website or search for it on Google, save their logo image and then do a reverse image search. Here’s a step-by-step guide, using Budweiser as a simple example.
1: Find and download the logo
how to do a reverse image search with logo
2: Select Google’s image search
how to do a reverse image search
3: Upload the logo
how to do a reverse image search
4: See the results
how to do a reverse image search
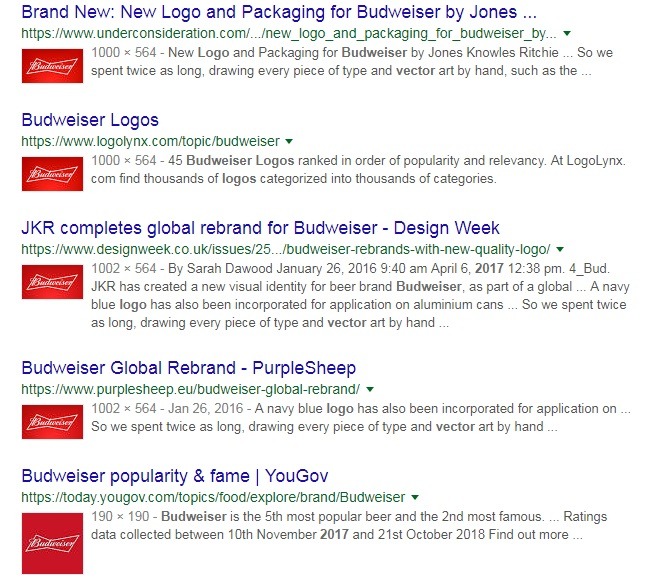
This won’t just help you find websites – including product reviews and PR, the brand is being discussed, but also where their backlinks are. A super handy way for an eCommerce business to use this is for finding new platforms to sell on, new partners, or review sites you’re missing. Or, instead of doing a logo search, choose a best-selling product to find other places they are selling.

8. Filter Out the Facebook Noise with FadFeed

FadFeed is a Chrome extension that filters out the Facebook noise on your feed to only show the Facebook ads for brands you’re following. This is very handy if you are keeping a close eye on your competitors’ Facebook marketing and want to be able to see just that from your browser.

9. Take a Sneak Peek at Your Competitors’ Sales [Shopify]

As you may know, Shopify assigns sequential order numbers to each order, found on the last page of the checkout page and in the sale confirmation email. What you might not know though, is that this information can help you get your closest Shopify competitors’ order numbers. Here’s the inside scoop on this simple hack:

Step 1:

On the first day of the month, buy the cheapest product your Shopify competitor has to offer and hang on to your order number.

Step 2:

One the last day of the month, buy the cheapest product your Shopify competitor has to offer.

Step 3:

Subtract one order number from the other to work out how many sales they have done in the month.

Step 4:

If your competitor is on par with you, you can then use your AOV to estimate the amount of revenue they have earned based on the number of sales they have made.

10. Use Mention to Track Your Competitors

Mention is an awesome tool for tracking who is talking about your competitors and what they are saying. Mention is best known as a tool to monitor where your brand has been mentioned in real-time: on blogs, social platforms, forums, eCommerce platforms and websites. However, what is less known about Mention is that you can also use it to track your biggest competitors as well.
apps to track competitors
mention online app
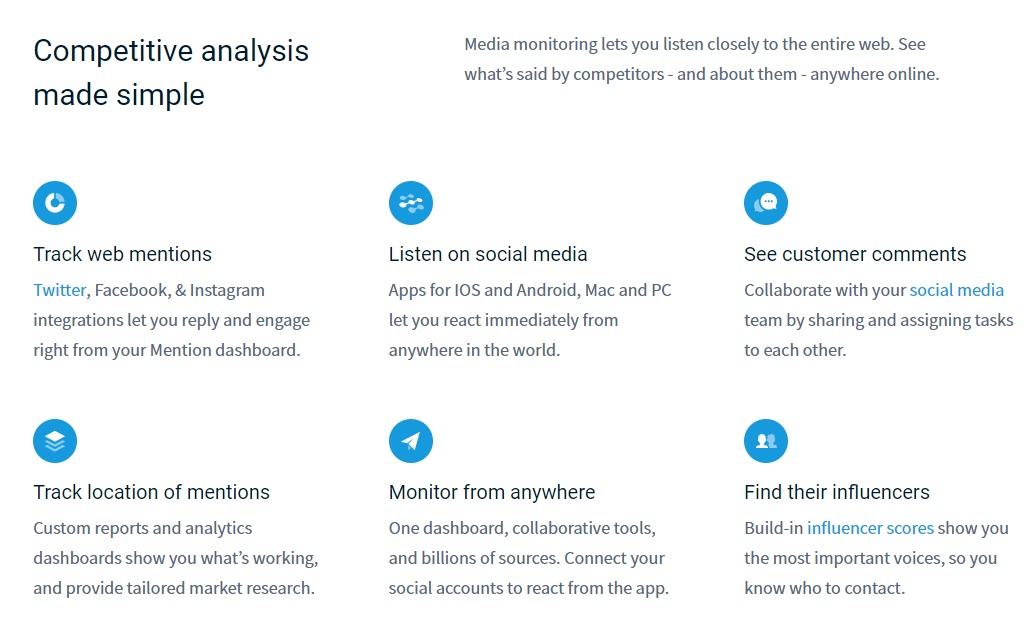
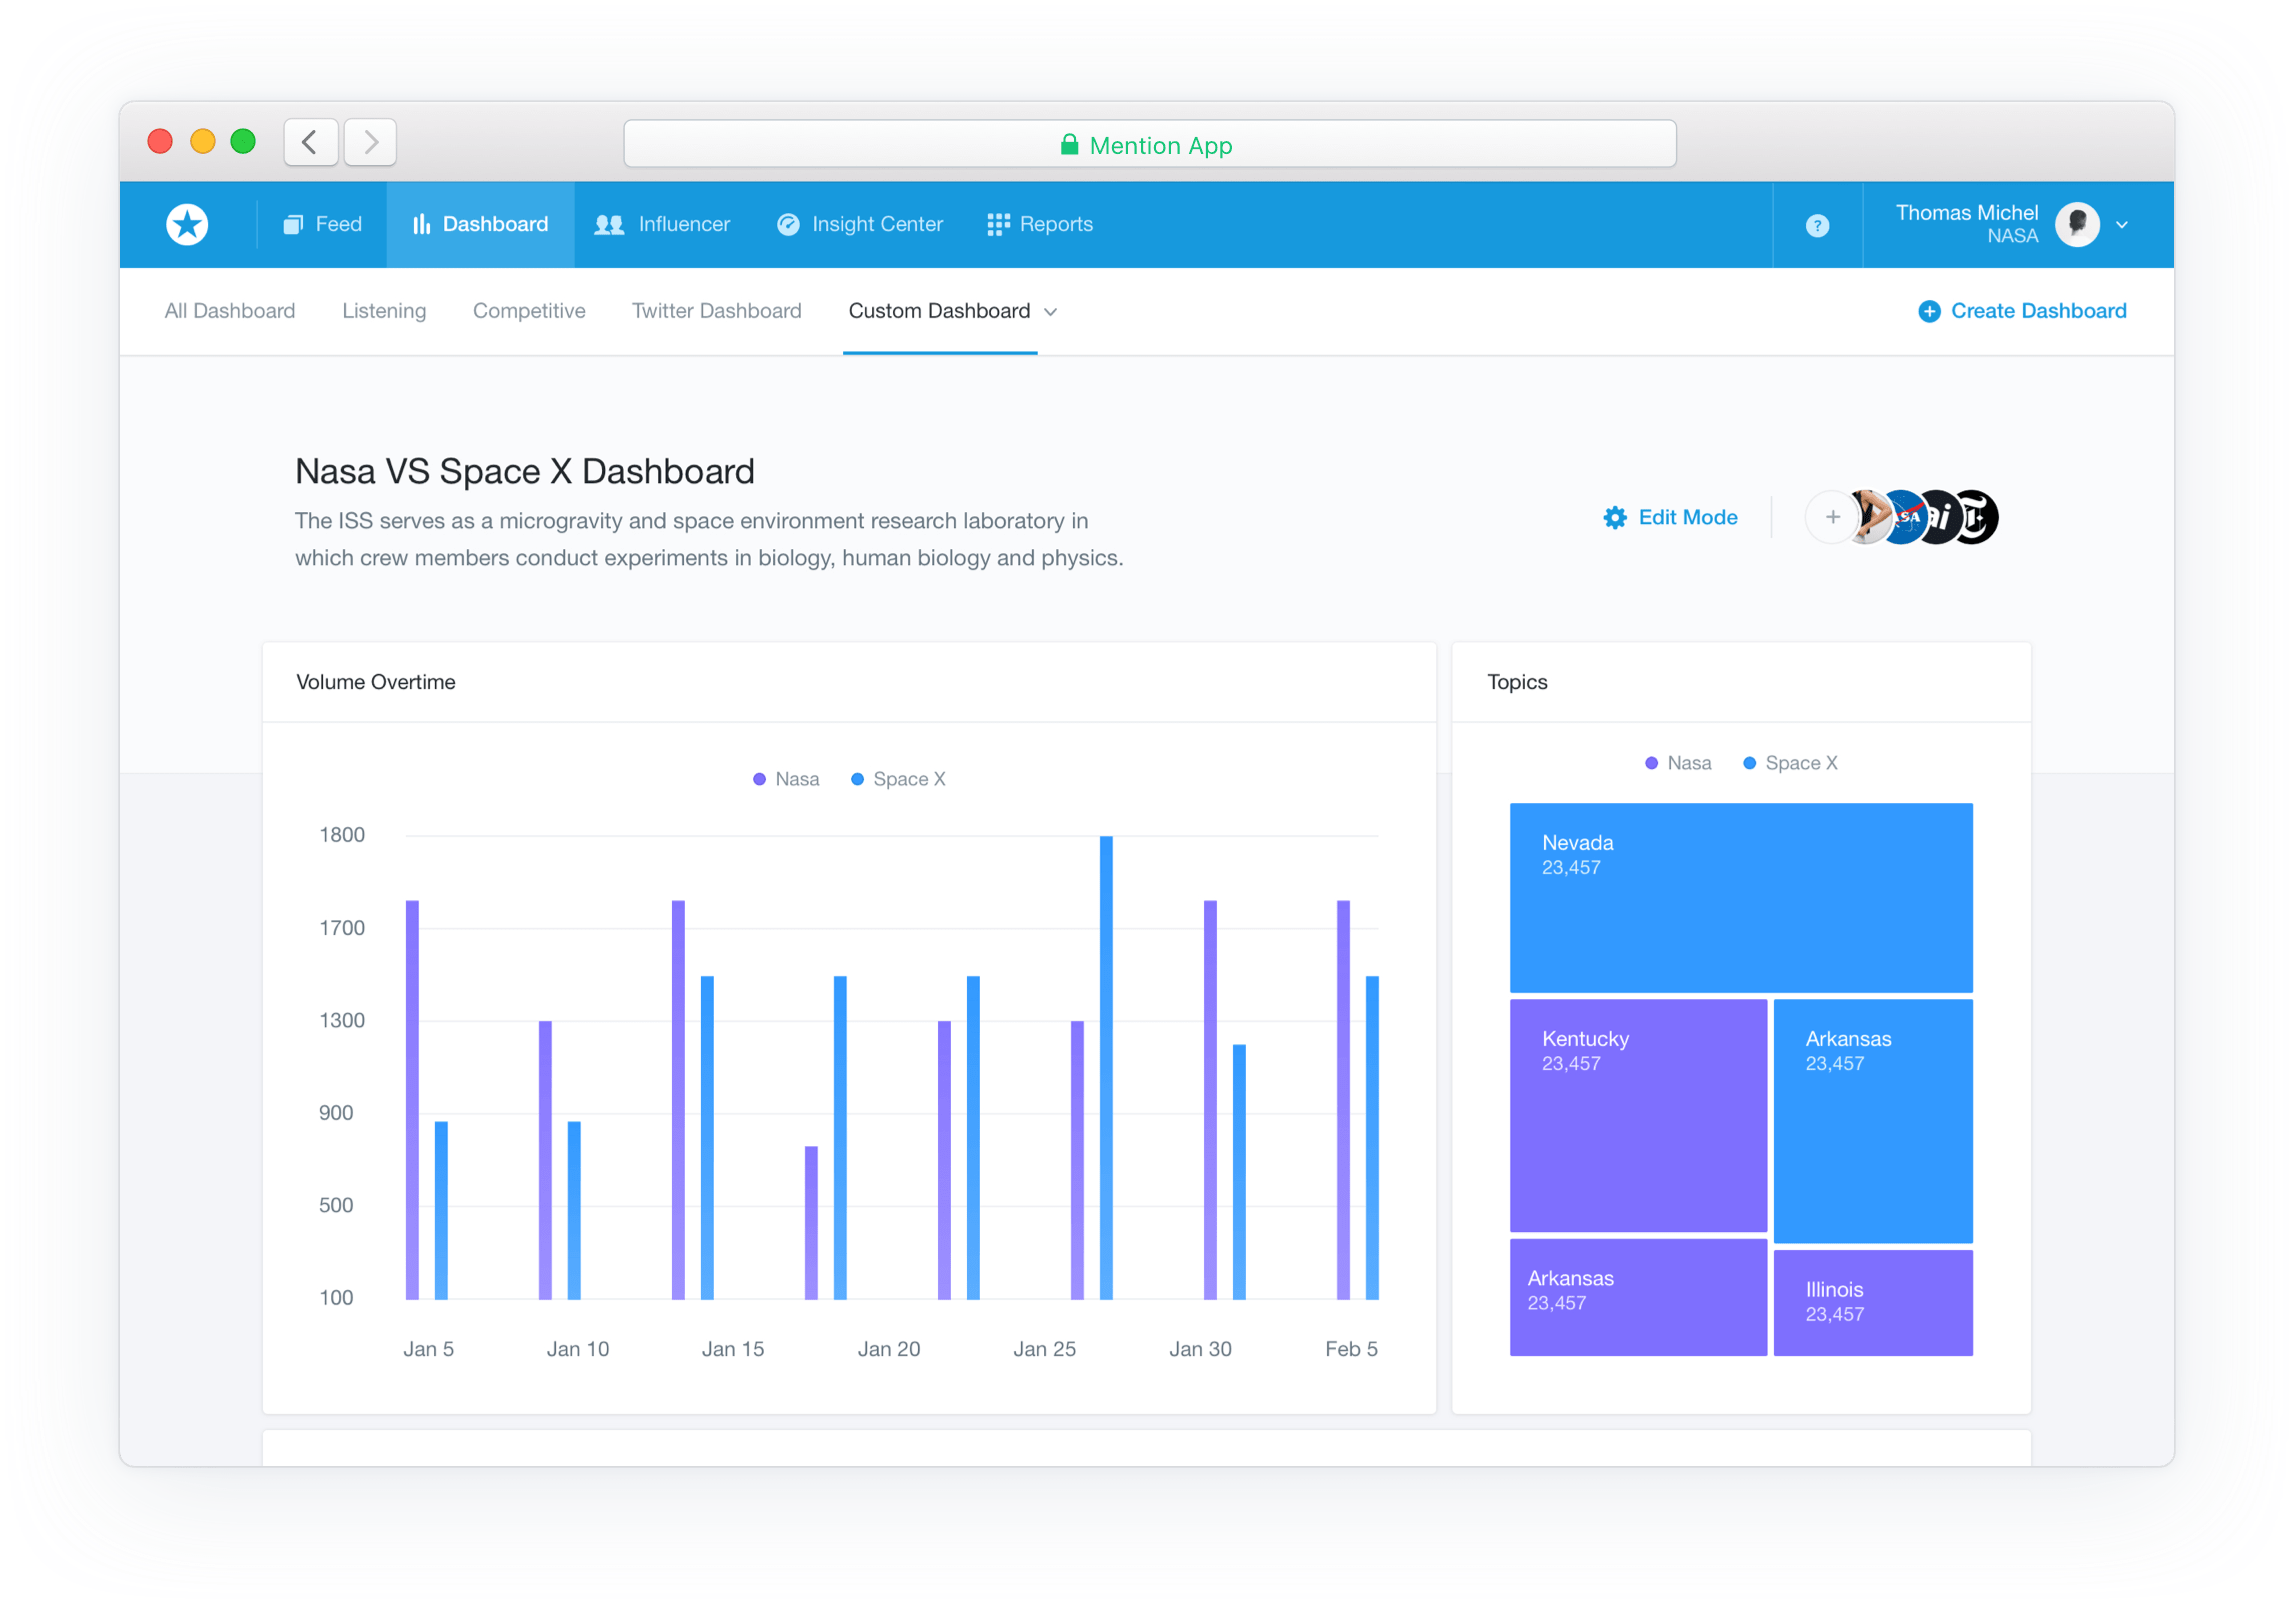
This data is hugely valuable as it will show you where, geographically, your competition is being talked about, enable you to monitor your competitors’ engagement strategies, see which influencers they are working with and get insights into their backlink strategies.
Beginner Tip: If you’re on a tight budget and don’t want to invest in Mention just yet, you can do a similar search manually with Google. Simply search your competitor’s brand name to see a list of sites where the brand is mentioned.

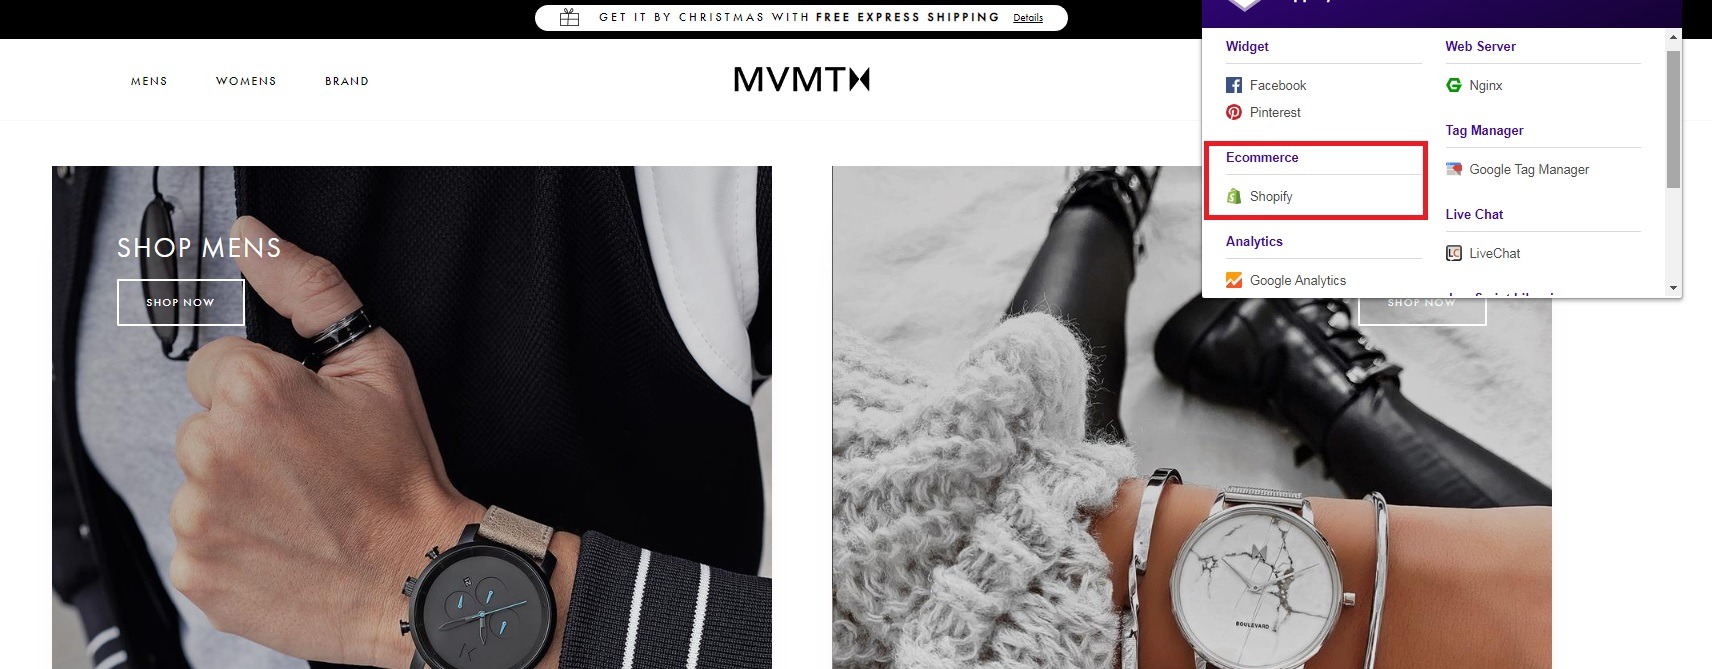
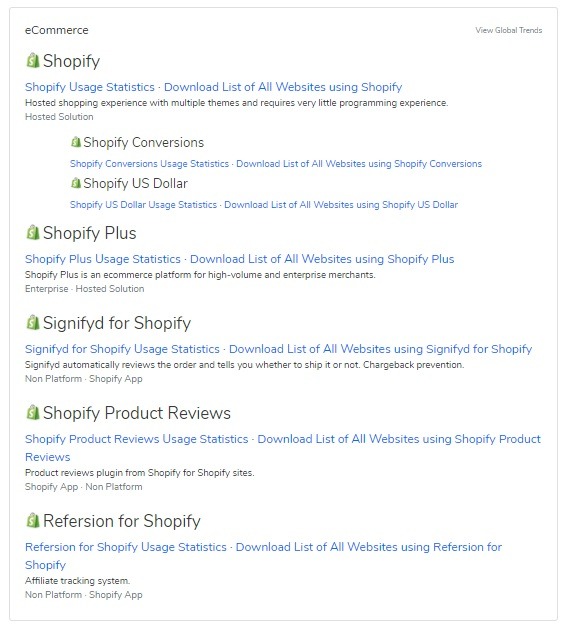
11. Use BuiltWith to Find Out the Platforms, Themes, Apps and Tools Your Competitors are Using

BuiltWith is an excellent web tool to help you find out all the behind-the-scenes tech tools your competitors are using. It’s as simple as inputting your competitor’s URL into BuiltWith’s search bar, like this:
find out what apps your competitors are using.
After which you will get a host of site data, including which email platforms or automated apps they use.
find out what apps your competitors are using
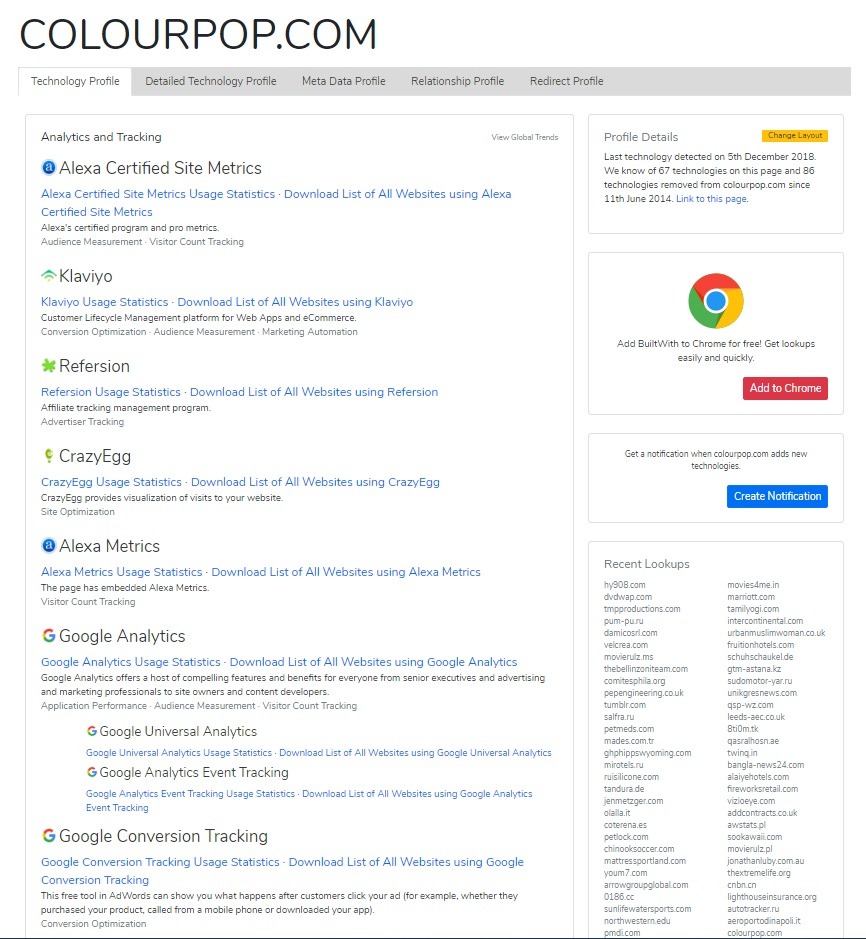
Here’s a list of things that BuiltWith with give you access to:
  • CDN types and hosting services
  • Widgets/apps
  • Email hosting providers
  • Brand’s tracking and analytics tools
  • Payment gateways
  • Monetization tools
  • Technology server
Additionally, if you want to know what type of Shopify plans and services your competitors are using, that’s included too!
how BuiltWith works

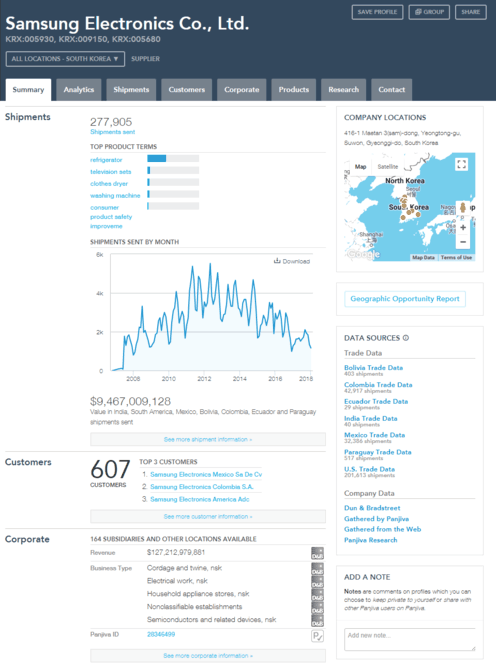
12. Discover Which Suppliers Your Competitors are Using with Panjiva

Panjiva is an online service offering data-driven insights for the global trade community that helps you find and evaluate legitimate businesses. So, what makes this so handy? With Panjiva you can find global suppliers and/or manufacturers, get detailed reports on who your competitors are doing business with, and track your competitors’ trade activity.
Ultimately, this will help you find products you could be adding to your store, find new locations your target market is located, discover legitimate suppliers and warehouses, and get a look at your supplier’s clients.
Panjiva
Here’s their example of Adidas’ supply chain.
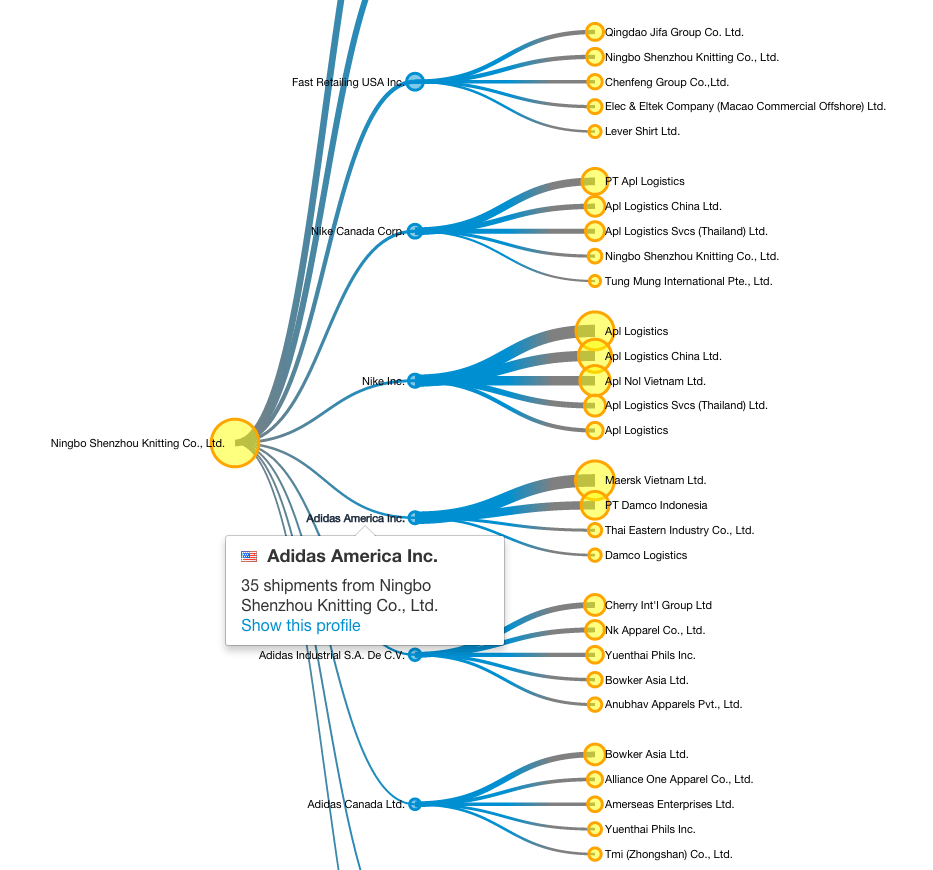
how to track competitor supply chain
[Image Source]
“Spying” on your closest competitors isn’t about copying their strategies exactly; it’s about getting a clearer understanding of your market, niche and potential selling opportunities for your brand. The idea is to find gaps in your market that you can fill with unique products and marketing strategies while keeping a close eye on your competitors.

May 17, 2019

Shopify Tutorial for Creating an Online Store

Shopify Tutorial for Creating an Online Store

Shopify is a subscription to a software service that offers you to create a website and use their shopping cart solution to sell, ship and manage your products. Using their service, you can get an access to easy to use admin panel where you can add products, process orders and enter store data.
For a monthly subscription of $29/mo you are able to build a full functional online store that you can use to sell digital or physical goods. Shopify also offers limited free trial.
If you want to create an online store using Shopify, you’ve come to the right place.
In this guide, I’ll show you how to use Shopify so you can launch your online store as soon as possible.
Ready? Let’s get started…
Table of contents:

How to Set up Your Own Online Shop with the Help of Shopify

Full disclosure: I earn a commission if you end up purchasing Shopify through my referral links in this guide. This helps me to keep WebsiteSetup up and running and up-to-date. Thanks for your support.
Signing up with Shopify and starting your store couldn’t be any easier and they even offer a 14-day free trial to get you going.
To launch your Shopify store, you must sign up for an account.

1. Sign Up with Shopify

Visit Shopify.com. Use the signup form to create an account.
Enter the required details and click the ‘Start free trial’ button.
shopify guide step 1
Your store name needs to be unique or Shopify will ask you to choose something else.
After this initial screen, you’ll be asked for a few more details, including your name, address, country and a contact number.
You will also be asked if you have products and, if so, what you aim to sell. If you’re just trying out Shopify to see if it works for you, you can select ‘I’m just playing around’ in the ‘Do you have products?’ dropdown, and ‘I’m not sure’ in the ‘What will you sell?’ section.
Once complete, click ‘I’m done’.

2. Start Setting Up Your Online Shop

After you’ve signed up you’ll be directed straight to your store admin screen. Now you are ready to start customizing your store, uploading products and setting up payments and shipping.
shopify admin panel 
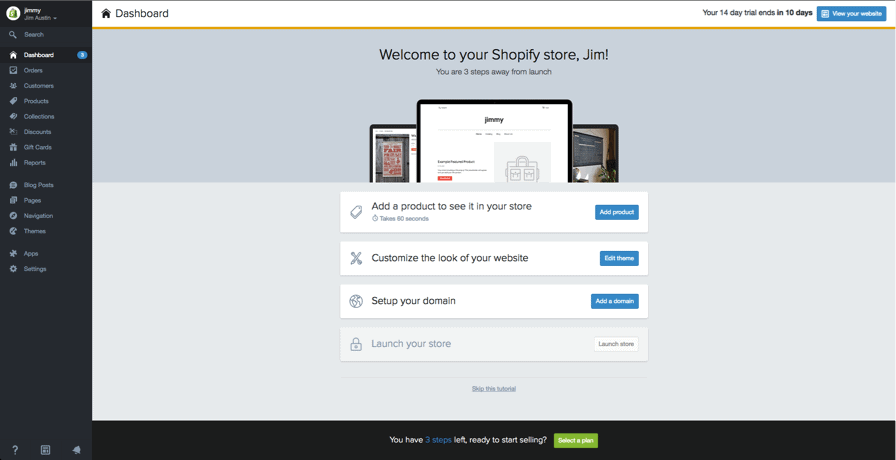
Your home admin screen tells you all you need to know to get you up and running.

3. Choose a “Theme” or a “Layout”

Shopify has its own official theme store. These themes are all guaranteed to have full support from the designers so you know that your store is in good hands.
All themes come with a comprehensive list of modifications you can make without having to touch a line of code. The premium themes come with more modifications, but you can also achieve a great looking site with a free one. These changes are outlined in the next section.
If you want to make wholesale changes to a theme, there are very few limitations on what can be achieved by accessing the HTML and CSS. Don’t worry if you haven’t got any coding experience. Shopify has an international team of design agencies they call ‘Shopify Experts’ that you can hire to fully customize your site.
To find a theme that suits your needs we recommend the following:

1. Browse the Theme Store

Log into Shopify and visit the Shopify Theme Store at themes.shopify.com. You’ll find over 70 theme variations to choose from, including a good selection of free ones.
You also could find Shopify themes on other Marketplaces, like TemplateMonster one.
Just choose, category, features to pick your theme.
You can filter by paid or free, industry and by features. You can also sort themes by price, popularity, and most recent.
 The Shopify Theme Store.

2. Check the functionality and reviews

Once you’ve found a theme you like, click on the theme’s sample image. You’ll be given more information about the theme, such as whether the theme is responsive/mobile ready among other features.
Scroll down to read some reviews about what other e-tailers using the theme think of it.

3. Preview the theme

To see the theme in action, click View Demo. You’ll see this below the green ‘Preview Theme in your Store’ button.
If the theme comes in a range of styles, you can also view demos of the different styles by clicking on them.

4. Get the theme

Once you’ve found a theme you like, click the green button.
Shopify will ask you to confirm that you want to install the theme.
Click Publish as my Shop’s Theme.
Don’t worry if you’re not 100% sure it’s the right theme for you. You can always change your mind later.
After the theme has installed, Shopify will let you know and will give you the option to Go to your Theme Manager.
Your theme manager shows published themes (the one you installed or activated most recently) and unpublished themes below (previously installed themes).
finish your ecommerce store

4. Edit Shopify Settings

The majority of Shopify themes allow you to make simple changes that can massively change the appearance of your store, so you can rest assured knowing you won’t end up with a website that looks like a clone of thousands of other stores.
shopify store templates
These stores are all built using the same theme.
On your admin screen, select ‘Themes’ from the left navigation menu. On this page you will see your live theme in a box at the top, in the top right corner of that box will be two buttons. The first one is of three dots, which gives you some basic settings changes. One of these allows you to make a duplicate of the theme. We highly recommend you do this in case you make some changes you don’t like, you can delete the duplicate and start again.
The second button says ‘Customize Theme’. If you click it you will be taken to a page that controls all the basic functionality of your store. This is a great time for you to have a thorough play with the settings and test out all the features so you can find out what your site is capable of.
shopify custom theme settings
Your themes custom settings.
changing colours in your theme
Changing colors in your theme.
The most common features will include:
  • uploading logos
  • uploading slides to a homepage carousel
  • adding related item functionality to product pages
  • choosing how many items appear on each line of the collection pages
  • color schemes
  • font choices.
Some themes will also allow you to reposition elements on pages such as showing product images on the left, right or center of the page. You can also choose whether you want to display social like/tweet/pin/+1 buttons.

5. Add Your Products to The Store

Navigating the bar on the left select ‘Products’. You will then see a blue ‘Add a product’ button in the top right corner of the page. Use the following screen to add as much detail as needed about your products. Especially look at those that will help with SEO such as name, description and URL. Include as many details as possible to help inform the customers about your items.
This is the screen where you upload product pictures. Once the images are uploaded you can rearrange them so don’t worry about uploading them in any particular order.
Your product screen
The Product screen. Make sure you fill out as much information as possible.
Product images can make a sale so make sure you show your products off to their best and highlight any special or unique features with close up photos. To keep your store looking tidy we suggest you keep all images the same dimensions. Unless you plan to make your collection pages look like a Pinterest board.
Once everything is filled out always remember to click the ‘Save product’ button in the top and bottom right corners.

Set up collections (groups of products)

A collection is any group of products that have some feature in common that customers might look for when visiting your store. For example, your customers might be shopping for:
  • clothes specifically for men, women, or children
  • items of a certain type, such as lamps, cushions, or rugs
  • items on sale
  • items in a certain sizes or colors
  • seasonal products such as holiday cards and decorations.
Products can appear in any number of collections. Usually, you would display your collections on your homepage and in the navigation bar. This helps customers find what they’re looking for without having to click through your whole catalog.
Your product screen
The Collection set up screen works in exactly the same way as the Product screen

Manual and automatic collections

When you add a new collection, you can select how products should be added to it. These are the two options:
  • Manually -
You add and remove products in a manual collection individually.
  • Automatically -
You can set up selection conditions to automatically include products that meet certain criteria.
Payment gateways
A payment gateway allows you to take payment from your customers via your website. The price and commission rate is important, but it’s also important to see what features they offer. Not all payment gateways are created equal.
You need to look at the following when choosing the right payment gateway for you.
payment gateways
  1. Transaction Fees
When you take a payment, some gateways will keep a small percentage or flat fee (or sometimes both) for letting you use their service. Compare these based on what your anticipated sales are.
  1. Card Types
You need to know what types of card are accepted by your chosen Payment Gateway. All accept VISA and Mastercard, while most accept American Express. Paypal is also becoming more popular for online payments.
  1. Offsite Checkout
Some gateways will take the payment on their own servers via their own form. This means that the customer is taken away from your checkout and they pay on the form provided by your payment gateway. They are then redirected to your confirmation page once the customer successfully pays. This allows you to have a bit more control of the checkout process.
You can circumvent Shopify’s limitations – they don’t let you customize the checkout other than with CSS.
Payment gateway transaction fees are added on top of Shopify’s own transaction fees. As of November stores based in the US and UK can use Shopify Payments. Depending upon your Shopify plan, you can save on these extra costs. Depending on your plan you will receive these highly appealing rates.
  • Basic 2.4% + 20p
  • Professional 2.1% + 20p
  • Unlimited 1.8% + 20p
Depending on how many transactions you make every month it could be worth upgrading to take advantage of these savings.
If you live in the US or UK your store will automatically use Shopify Payments. To complete this, click the ‘Complete Shopify Payments account setup’ button found in Settings > Payments. If you wish to use a third party gateway you can use the ‘enable payment gateways’ link on the same page.

6. Get Your Online Shop “LIVE”

Before your site can go live you need to add a few more details about your company and how you plan to make deliveries and pay tax.

General

Make sure all your business information is filled out on this page. Make sure to use the Google Analytics feature. This can prove to be an invaluable source for tracking your store visitors.
general shopify settings

Taxes

taxes for shopify online store

  1. Go to the Products page of your admin
  1. Click on the name of a given product.
  1. Scroll down to the section called “Inventory & variants”.
  1. Click on the edit link next to your Product Variant to open a dialog window.
  1. Make sure the checkboxes next to Charge taxes and Requires shipping are checked if you need to include these with your products.
  1. Some stores won’t need to charge taxes or shipping on products like digital goods. On the other hand, a T-shirt store will likely need to charge both.
  1. If you are planning to ship your product to customers, make sure to enter the product’s weight in the appropriate field.

Shipping

If your shipping rates are too narrow, or you don’t give enough options, you may lose out on some sales. Shopify will only calculate a shipping rate for your customers based on the rules that you define in the Shipping page of the admin. To make sure you won’t lose any sales:
shipping info
  1. From your store admin, go to the Settings > Shipping page.
  1. In the “Shipping rates” section, see if you have set a weight-based shipping rate and adjust it according to your product’s specifications.

Test your order system

To test your system you can simulate a transaction using Shopify’s Bogus Gateway.
Using the Bogus Gateway:
  1. From your store Admin, click Settings, then Payments to go to your Payments settings
  1. If you have a credit card gateway enabled, deactivate it before continuing. (Click Edit, then Deactivate, then confirm your deactivation.)
  1. In the Accept credit cards section, click Select a Credit Card Gateway to open the drop-down menu.
  1. Scroll down the list to Other, then click (for testing) Bogus Gateway.
  1. Click Activate (or Reactivate, if you’ve used the Bogus Gateway before).
  1. Go to your storefront and place an order as a customer would. At checkout, enter the following credit card details instead of genuine numbers:
Testing a real payment gateway with a genuine transaction:
  1. Make sure you’ve set up the payment gateway you want to test.
  1. Make a purchase from your store as a customer would, and complete checkout using genuine credit card details.
  1. Cancel the order immediately, to refund yourself and avoid paying transaction fees.
  1. Log in to your payment gateway to make sure the funds went through.

Is this free?

Yes – just be sure to cancel and refund the order soon after you place it.
If your billing cycle hits after you’ve placed the test order but before you cancel it, the transaction fees will appear on your bill. You can still cancel after paying your bill to Shopify, but you’ll receive the refund as a transaction credit on your account. You can use transaction credits to pay future transaction fees.

7. Add a Domain Name

To get your site live you’ll need a domain name. You have two choices.
Firstly you can buy a domain from Shopify and it will be added to your store automatically. This saves you time, especially if you have no knowledge about hosting a website. These domains typically cost $9-$14 USD per year. Your second option is to purchase a domain from a third party such as GoDaddy. These domains start from $10.00 USD a year. The downside is that you’ll have to redirect the DNS records yourself which can seem daunting at first.
If you’re unable to come up with a good domain name, read my tips on how to choose a good domain name.
Here are the steps to put your new Shopify store live on a third party domain name.
  1. Add the new domain in Shopify
In the Shopify admin, on the left navigation go to Settings and then Domains and add your domain name using the ‘Add an existing domain’ button.
  1. Update DNS records
Login to your domain registrar and make the following changes to the DNS records:
  • Replace the @ or main A record with the following IP address: 23.227.38.32
  • Add or replace the www CNAME with storename.myshopify.com (i.e. your store Shopify link without the HTTP, which you can see on the domains settings page)
  1. Remove any storefront passwords
Otherwise, no one will be able to access your site even when it’s live.
  1. Set as primary if relevant
Whilst in Settings > Domains, you can choose your main domain by using the drop-down at the top of the screen:
primary store domain
Ensure that you also check the ‘Redirect all traffic to this domain’. This means that traffic to all other domains will be directed to your primary domain. This is crucial for good SEO.
  1. Adding other domains 
You can repeat steps 1 and 2 with other domain names you own. All domain names will redirect to the ‘Primary’ domain, which you can change at any time with the ‘Set as primary’ option next to each domain name.
Note that the number of domain names you own has no influence on SEO.
adding custom domains on shopify

Congratulations, Your New Shopify Store is Ready!

If you have managed that way – congratulations. You should now have a fully working online store. If you want to explore alternatives, see below: